Migrating mashups
Not all mashups are implemented the same way. Consider the following content as a guide that outlines some of the considerations involved in the mashup migration process. Make sure you have completed the following before attempting to migrate mashups:
-
You have deployed and configured a Qlik Cloud tenant.
-
Users can authenticate through the IdP, and the necessary apps have been migrated to the appropriate shared or managed spaces, where users have Can view permissions as a minimum. For information about space permissions, see Managing permissions in shared spaces and Managing permissions in managed spaces.
-
Access to the tenant with the tenant admin role (required to create a web integration).
You should also be familiar with how Qlik Sense mashups are typically implemented using JavaScript and HTML, whether they are embedding objects just with IFrames or with the Qlik Capability APIs.
For clarity, new mashups will refer to those in Qlik Cloud and old mashups will refer to existing mashups in Qlik Sense Client-Managed.
Web integrations
Your new mashups in Qlik Cloud will load and embed content from your Qlik Cloud tenant instead of Qlik Sense Client-Managed. You must configure a web integration in Qlik Cloud so that it can identify your mashup website (origin).
Web integrations are a security mechanism that allow websites that present a valid ID associated with a URL inclusion list, to render embedded visualizations. Any web application that interacts with Qlik Cloud requires a web integration to be configured in your tenant.
Creating a web integration in Qlik Cloud
You must be a tenant admin in Qlik Cloud to create a web integration.
Do the following:
- In the Administration activity center, go to Web.
- Click Create new.
-
Provide a name for the web integration.
-
Enter the origin address in the format https://domain.com.
-
For nonstandard ports, include the port number in the address (for example, https://domain.com:8080).
Information noteQlik Cloud does not support wildcard domains for web integration origins, so make sure to specify explicit domain addresses. -
-
Click Add to include the origin in the allowlist.
-
If needed, add more origins.
- Click Create to complete the process.
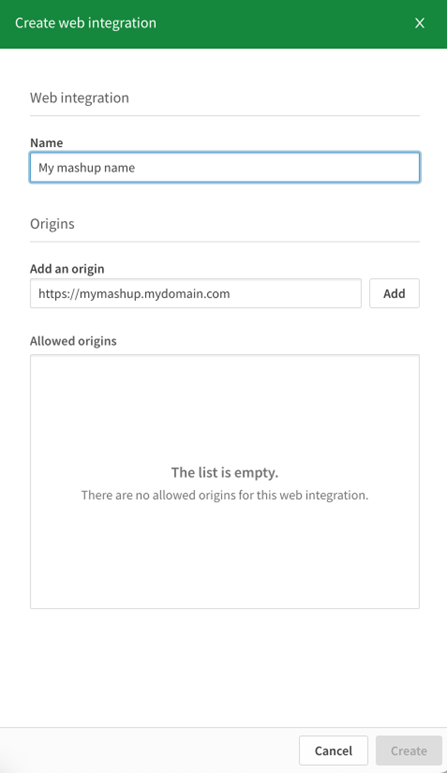
Once you create the web integration, you will be given an ID. This is the qlik web integration ID for your mashup, which is a required attribute or parameter in the new mashup code.
Web integration ID

For more information about creating web integrations, see Managing web integrations.
Authentication
Mashups in Qlik Sense Client-Managed usually handle authentication through a virtual proxy, where the authentication mechanism is preconfigured. The options include Header, Ticket, SAML, JWT, OpenID Connect ( OIDC), and Anonymous among others. For more information, see Authentication solutions.
In your Qlik Sense Client-Managed old mashup, authentication is typically handled in the code before any resources, including necessary static Qlik files and libraries, are loaded through this virtual proxy.
For example,
-
With Ticket and JWT, there is usually a call to the backend authentication module to securely create a Qlik ticket or a JWT token.
-
With Header, some underlying module or reverse proxy sets the appropriate header.
-
For OIDC and SAML, there must be an initial redirect to the corresponding identity provider that triggers the authentication flow to finally initiate the session with Qlik Sense, so that it can load resources and start embedding content.
Qlik Cloud does not use a virtual proxy. Instead, it uses a web integration that you create in the tenant. For authentication, the following two mechanisms are available:
-
Interactive sign-in—This mechanism relies on the configured IdP that your tenant uses for regular access. This is Qlik Account IdP by default, or any of the available options such as, Okta, Auth0, ADFS, AzureAD, Salesforce, Generic, and Keycloak.
-
JSON Web Tokens (JWT)—This authentication mechanism relies on signed JWT tokens that are typically securely generated by a back-end service. In this case, there should be a configured Identity Provider in your tenant of the type JWT.
Mashups where Qlik objects are embedded with Capability APIs
Authentication using interactive sign-in
HTML potential code updates
As with your Qlik Sense Client-Managed mashup, you must load two Qlik static files in the <head> section in html (qlik-styles.css and require.js). However, with Qlik Cloud, these files are directly accessible with no authentication required.
HTML potential code updates

JavaScript potential code updates
If your Qlik Sense Client-Managed mashup is using Capability APIs to embed and interact with objects on Qlik Sense Client-Managed, review the following code, which in this example embeds several visualizations using the Capability API Qlik library.
JavaScript potential code updates
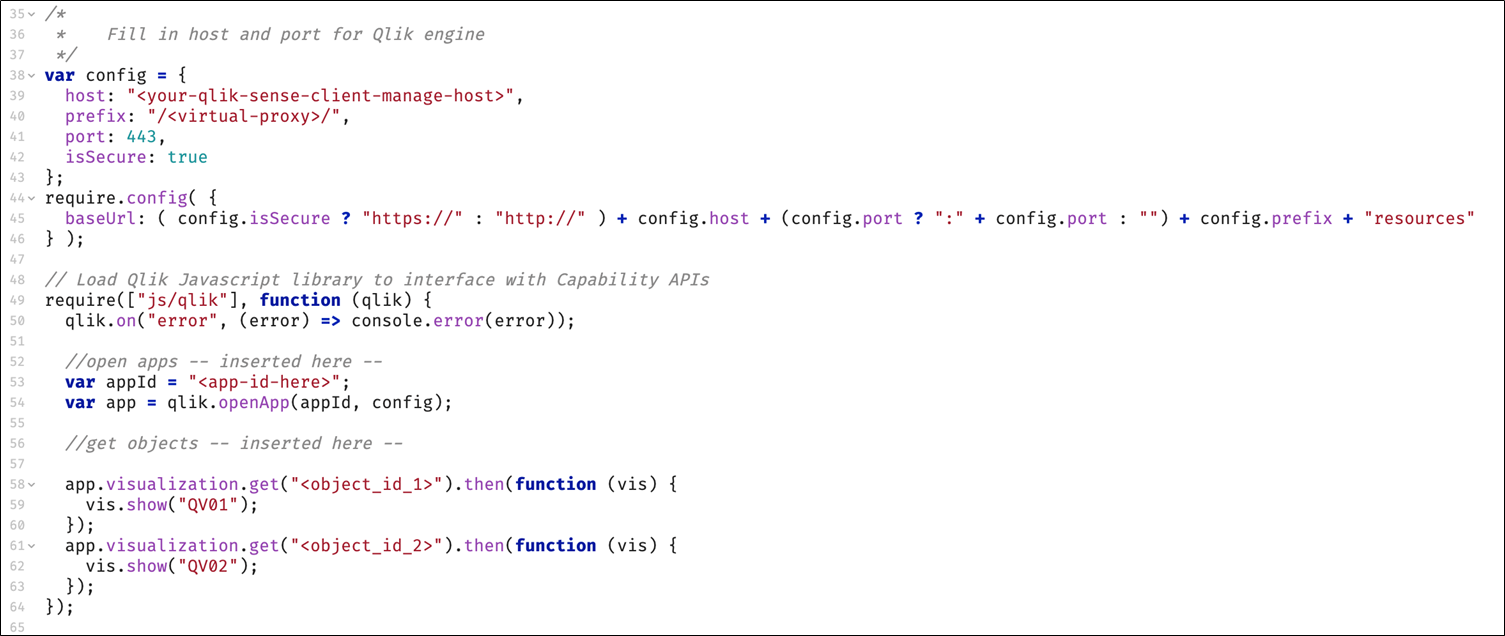
Configuration variable and baseUrl for require
With your new Qlik Cloud mashup, the configuration variable must reflect your tenant host and the webIntegrationId. Also, since there is no virtual proxy, the prefix should just be /. You can set an identity attribute so that the session is not shared and is used only for the context of this mashup. The port must be 443, which implies isSecure is always true.
The require configuration should contain your webIntegrationId, and baseUrl is simpler since communications to Qlik Cloud are always over https on port 443.
Configuration variable and baseURL for require

Loading Capability APIs
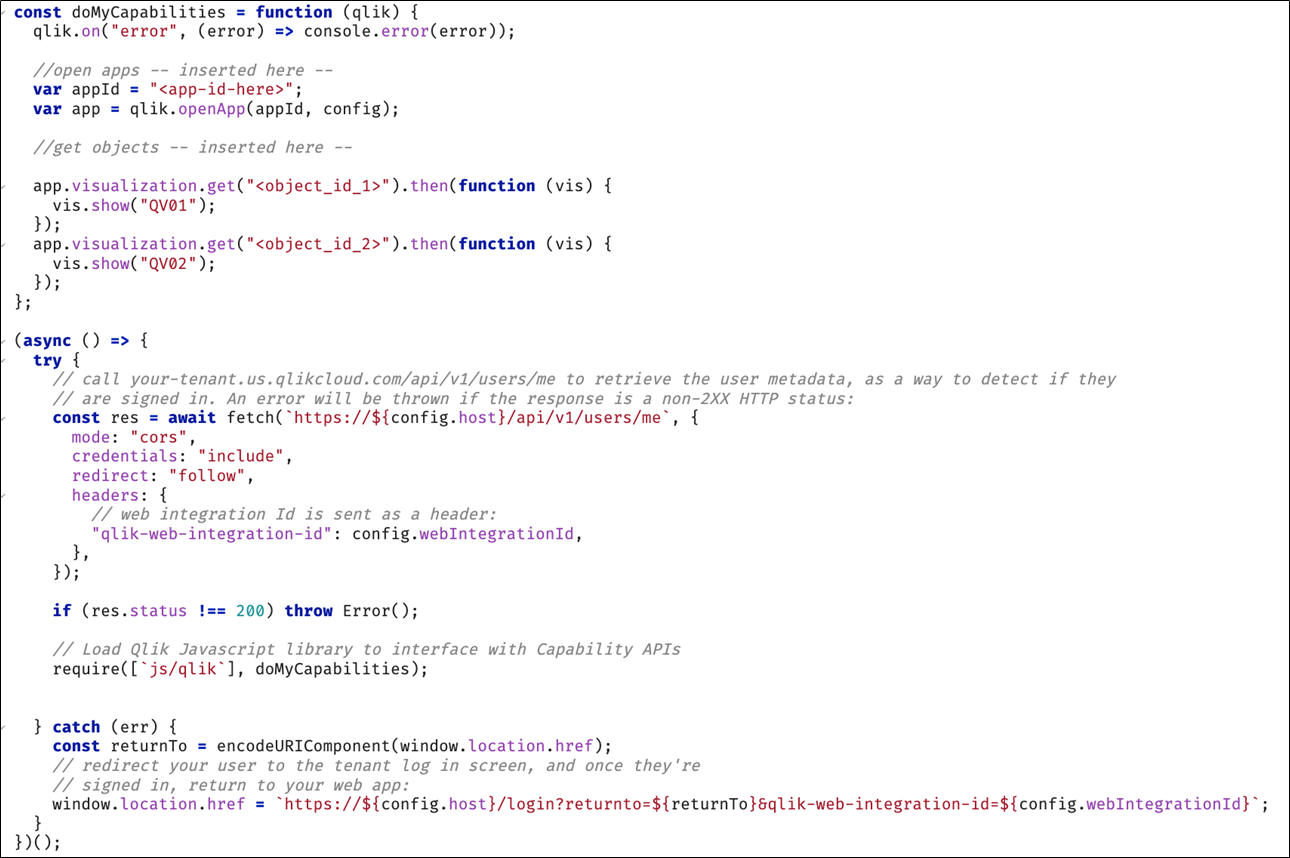
Before loading the Qlik Capability API library with require (js/qlik), check if the user is already signed in. This can be done, for example, by triggering a REST API call for the current user metadata endpoint. If the response status is not 200, the code must redirect to the login screen, injecting two parameters in the URL: returnto (your actual mashup URL) and qlik-web-integration-id.
The code execution is as follows:
-
Check if the user is already signed-in with a GET request to the /api/v1/users/me REST API endpoint.
-
If negative (response status is not 200), redirect to the login screen/login adding return to and qlik-web-integration-id parameters.
-
If positive (response status is 200), load qlik/js Capability APIs library with require and continue using this set of APIs.
-
The final code might look like the following example. With JavaScript there isn't one unique way to write the perfect code, so this is just one valid code option.
Authentication using JSON Web Token (JWT)
Configure a JWT identity provider
A JWT token is the result of the encryption of some payload user metadata (such as name, email, groups, subject) that is signed securely with a certificate private key. Anyone with the associated certificate public key can validate the token and read the user information in it.
For Qlik Cloud to validate your signed JWT tokens, you must configure an identity provider in your Qlik Cloud tenant of the type JWT. Once configured, the tenant can accept and validate API requests that contain a properly signed bearer JWT token.
Do the following:
-
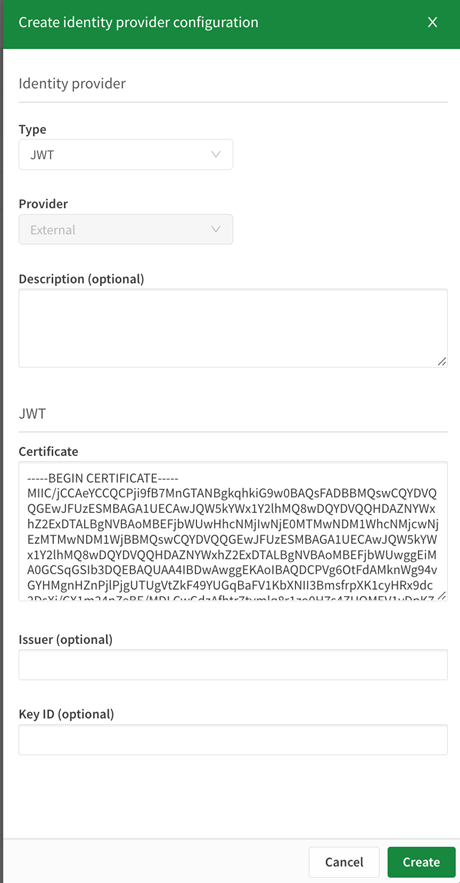
In the Administration activity center, select Identity provider from the Configuration section to create a new one.
Create an identity provider configuration with type JWT
-
Paste the certificate public key in PEM format in the Certificate box above.
If your old mashup already uses JWT for authentication with Qlik Sense Client-Managed, you might already know the certificate private and public keys being used. Also, you might already have a backend service for creating signed JWT tokens. If not, refer to Create Signed Tokens for JWT Authorization.
-
Optionally, you can specify the Issuer and Key ID, either way you’ll be provided with these values after the creation.
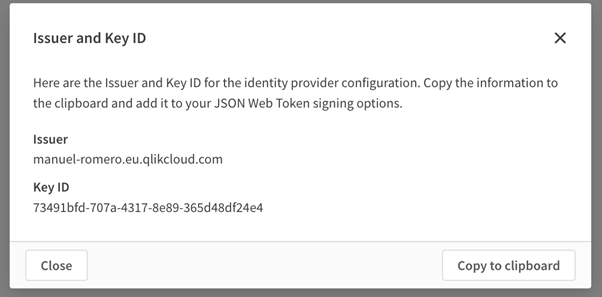
Signed JWT token backend service potential code updates
With Qlik Sense Client-Managed, the payload to generate a JWT token required only the claims User ID and User Directory, as required by the virtual proxy in Qlik Sense for JWT authentication. With Qlik Cloud, this payload requires more and different claims attributes.
You’ll have to adjust the JWT token generation backend service code for the payload, together with the necessary signing options, to reflect what is required with Qlik Cloud. For example, Issuer and Key ID of the JWT identity provider are mandatory signing options. See JWT format for Qlik Sense authorization for a complete description.
HTML potential code updates
As with your Qlik Sense Client-Managed mashup, you must load two Qlik static files in the <head> section in html (qlik-styles.css and require.js). However, with Qlik Cloud, these files are directly accessible with no authentication required.
JavaScript potential code updates
The code concept is similar to using Interactive Sign-in. However, in this case, instead of a redirect to the regular login screen, you must initiate a JWT session with a POST request to the /login/jwt-session endpoint, passing the headers for the bearer JWT token and the web integration id.
Do the following:
-
Check if the user is already signed in with a request to the /api/v1/users/me REST API endpoint.
-
If positive (response status is 200), load and use the qlik/js Capability APIs library with require.
-
If negative (response status not 200), trigger a POST request to initiate the JWT session with the given signed JWT token.
-
If positive, load and use qlik/js Capability APIs library with require.
-
-
If negative, it is likely the JWT authentication failed because the JWT is invalid, expired, or not accepted.
-
The following is a code example of the process described above.
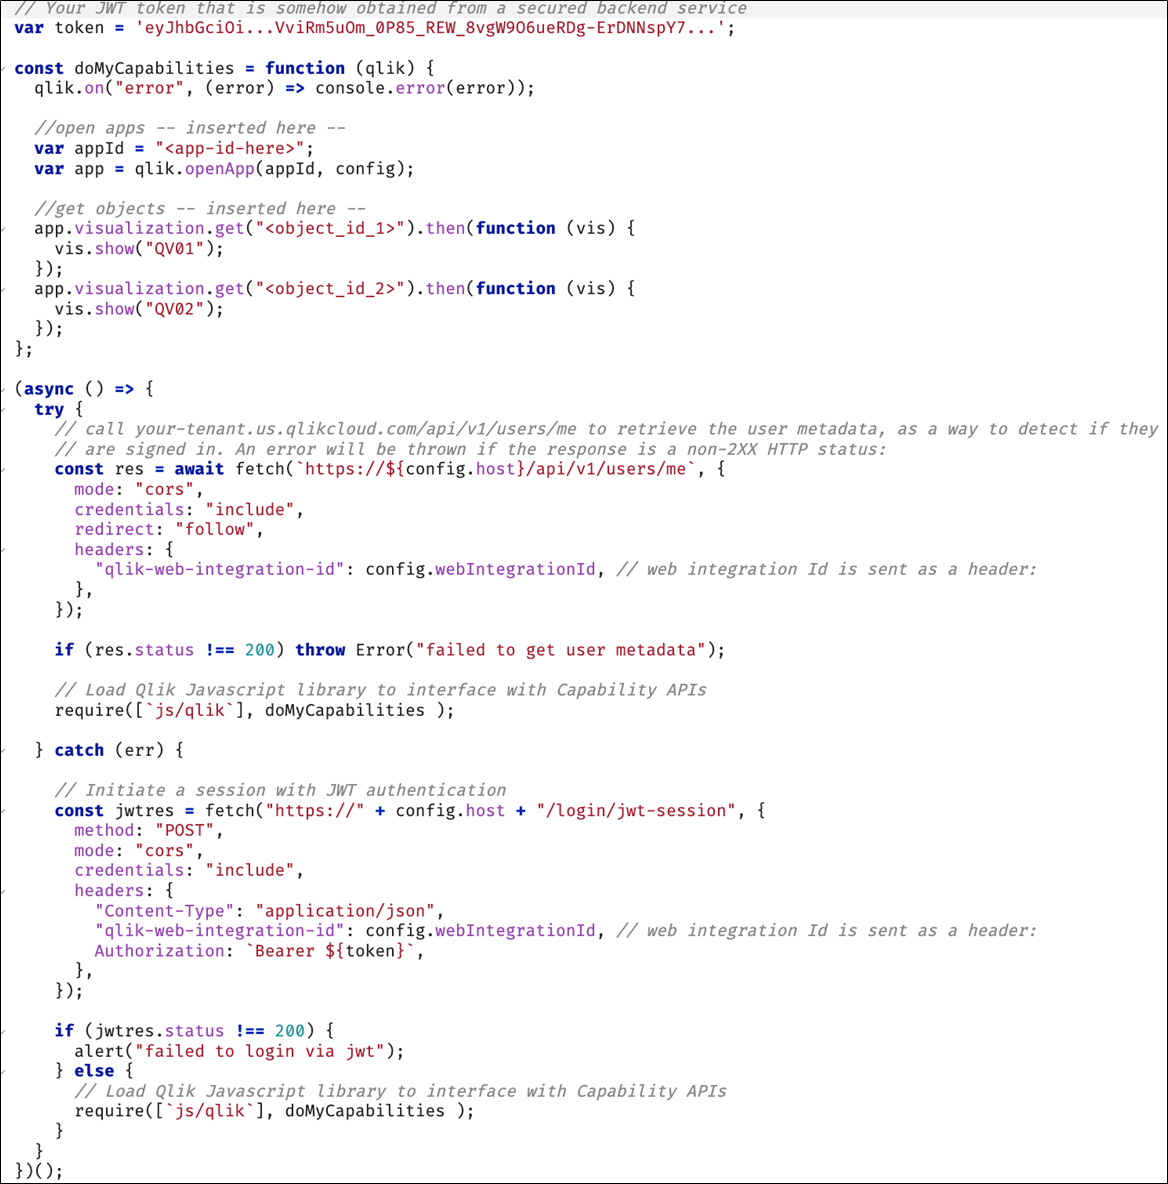
Capability APIs and compatibility in Qlik Cloud
The Capability APIs are a JavaScript library that let you interact with a collection of different APIs, for example Root API, Visualization API, App API, Global API, Field API, Table API, Variable API and more. See Capability APIs for a complete list .
Although there is almost complete compatibility between Qlik Cloud and Qlik Sense Client-Managed when using Capability APIs for your web application, there are a few subtle differences or unavailable methods if you use this JavaScript library for websites with Qlik Cloud deployments. For example, Global API is unavailable in Qlik Cloud.
See API comparison between products for more details.
Mashups where Qlik objects are embedded with IFrames
In addition to handling authentication as described in Mashups where Qlik objects are embedded with Capability APIs, you must be familiar with how Qlik Cloud handles the Content Security Policy (CSP).
Content Security Policy
The CSP policy in Qlik Cloud blocks access to Qlik objects from other domains. This means that when embedding Qlik objects using the Single API IFrame approach, you will get the frame-ancestors ‘self’ policy error.
Policy error: frame-ancestors 'self'

See Content Security Policy to learn how to configure CSP so that your mashup can use IFrames to embed Qlik Cloud objects.
Mashups using enigma.js
The enigma.js library helps you communicate with the Qlik associative engine in JavaScript environments.
Separate from required web integration and user authentication handling, you must also consider the Cross-site Request Forgery (CSRF) concept when using enigma.js on Qlik.
Cross-Site Request Forgery (CSRF)
Qlik Cloud has countermeasures to guard against Cross-Site Request Forgery (CSRF). Any web solution that interacts with Qlik Cloud must provide a valid CSRF token on all non-GET REST calls, including WebSocket connections.
When using enigma.js in your web application, either in the back-end or front-end code, a WebSocket connection is created. This means that a CRSF token needs to be included as a parameter of the WebSocket connection for the enigma.js library to open a secure session with Qlik Cloud.
Once the user is signed in, a valid CSRF token can be requested to the /api/v1/csrf-token endpoint.
The following code example (with a signed in user) of enigma.js is used in the front-end code to open an app and fetch the layout.
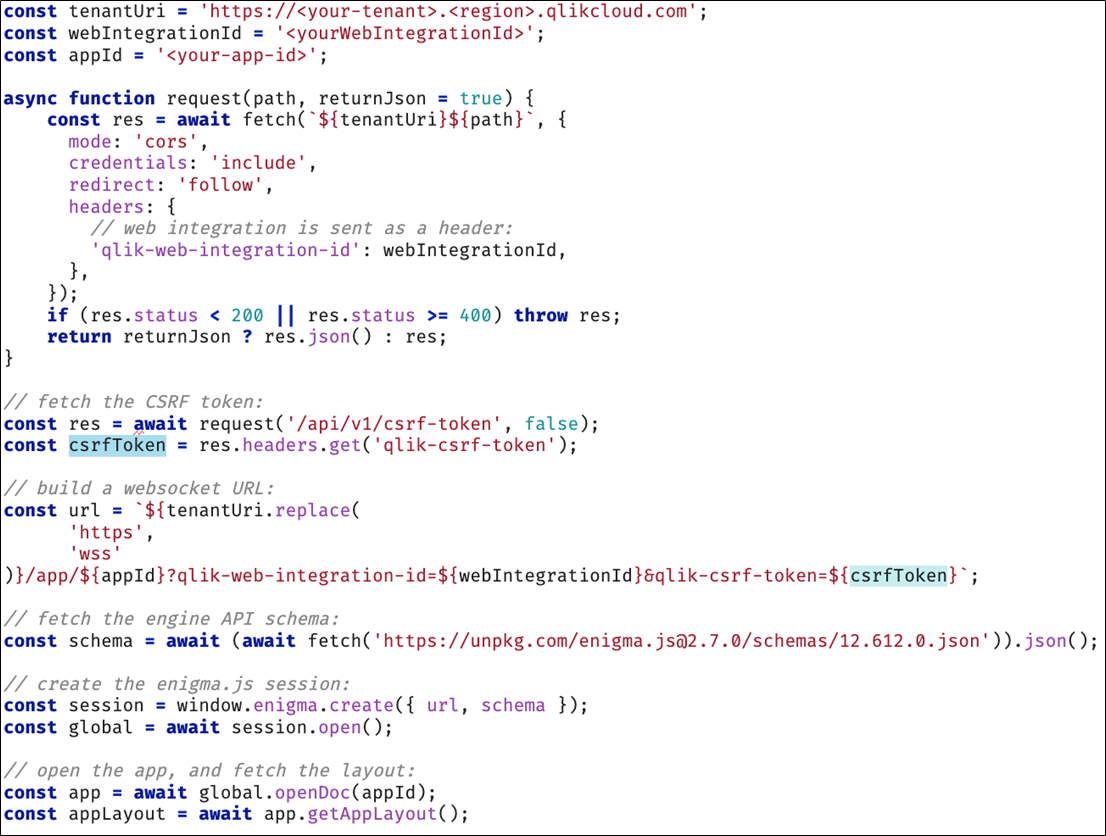
To see a full code example, review the following tutorials:
