Enabling lineage for Big Data Jobs
Setting up data lineage with Cloudera Navigator
The support for Cloudera Navigator is now available in Talend Spark Jobs.
If you are using Cloudera V5.5+ to run your Jobs, you can make use of Cloudera Navigator to trace the lineage of given data flow to discover how this data flow was generated by a Spark Job, including the components used in this Job and the schema changes between the components.
If you are using CDP Private Cloud Base or CDP Public Cloud to run your Jobs, it is recommended to use Apache Atlas. If you are using CDP dynamic distribution, Apache Atlas is used rather than Cloudera Navigator. For more information, see Setting up data lineage with Atlas.
For example, assume that you have designed the following Job and you want to generate lineage information about it:
- Click Run to open its view and then click the Hadoop configuration tab. For a Spark Job, the tab to be used is Spark configuration.
- From the Distribution list, select
Cloudera and from the Version
list, select Cloudera 5.5. Then the Use Cloudera
Navigator check box is displayed.
With this option activated, you need to set the following parameters:
-
Username and Password: this is the credentials you use to connect to your Cloudera Navigator.
-
Cloudera Navigator URL: enter the location of the Cloudera Navigator to be connected to.
-
Cloudera Navigator Metadata URL: enter the location of the Navigator Metadata.
-
Activate the autocommit option: select this check box to make Cloudera Navigator generate the lineage of the current Job at the end of the execution of this Job.
Since this option actually forces Cloudera Navigator to generate lineages of all its available entities such as HDFS files and directories, Hive queries or Pig scripts, it is not recommended for the production environment because it will slow the Job.
- Kill the job if Cloudera Navigator fails: select this check box to stop the execution of the Job when the connection to your Cloudera Navigator fails. Otherwise, leave it clear to allow your Job to continue to run.
-
Disable SSL validation: select this check box to make your Job to connect to Cloudera Navigator without the SSL validation process.
This feature is meant to facilitate the test of your Job but is not recommended to be used in a production cluster.
-
Till now, the connection to Cloudera Navigator has been set up. The time when you run this Job, the lineage will be automatically generated in Cloudera Navigator. You still need to configure the other parameters in the Spark configuration tab in order to successfully run the Job.
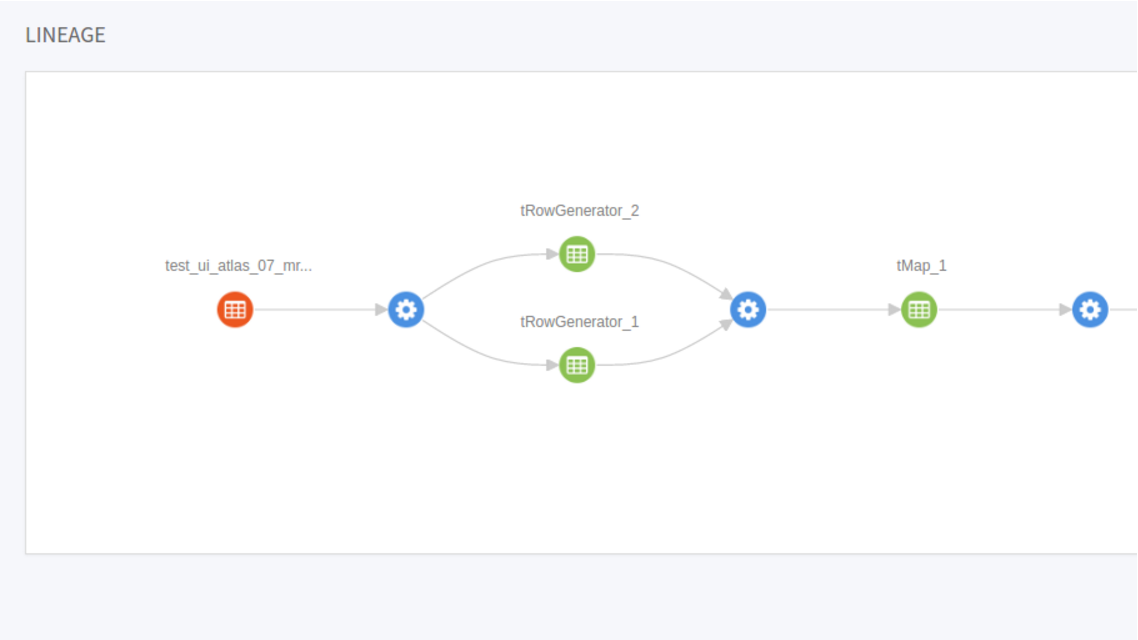
When the execution of the Job is done, perform a search in Cloudera Navigator for the data written by this Job and see the lineage of this data in Cloudera Navigator. If you compare this lineage graph with the Job in Talend Studio, you can see that every component is presented in this graph and you can expand the icon of each component to read the schema it uses.
Cloudera Navigator uses a Cloudera SDK library to provide functionalities and must be compatible with the version of this SDK library. The version of your Cloudera Navigator is determined by the Cloudera Manager installed with your Cloudera distribution and the compatible SDK is automatically used based on the version of your Navigator.
However, not all the Cloudera Navigator versions have their compatible SDK versions. For more details about the Cloudera SDK versions and their compatible Navigator versions, see the Cloudera documentation about Cloudera Navigator SDK Version Compatibility.
For more information about Cloudera Navigator versions supported by Talend Studio, see Supported Cloudera Navigator versions for Talend Jobs.
Setting up data lineage with Atlas
The support for Apache Atlas is now available in Talend Spark Jobs.
If you are using Hortonworks Data Platform V2.4 onwards to run your Jobs and Apache Atlas is already installed in your Hortonworks cluster, you can make use of Atlas to trace the lineage of given data flow to discover how this data was generated by a Spark Job, including the components used in this Job and the schema changes between the components.
If you are using CDP Private Cloud Base or CDP Public Cloud to run your Jobs and Apache Atlas is already installed in your cluster, you can also make use of Atlas either using Spark Universal 3.3.x (recommended) or Cloudera CDP 7.x [Built-in] in Spark Configuration.
- Hortonworks Data Platform V2.4, the Talend Studio supports Atlas 0.5 only.
- Hortonworks Data Platform V2.5, the Talend Studio supports Atlas 0.7 only.
- Hortonworks Data Platform V3.14, the Talend Studio support Atlas 1.1 only.
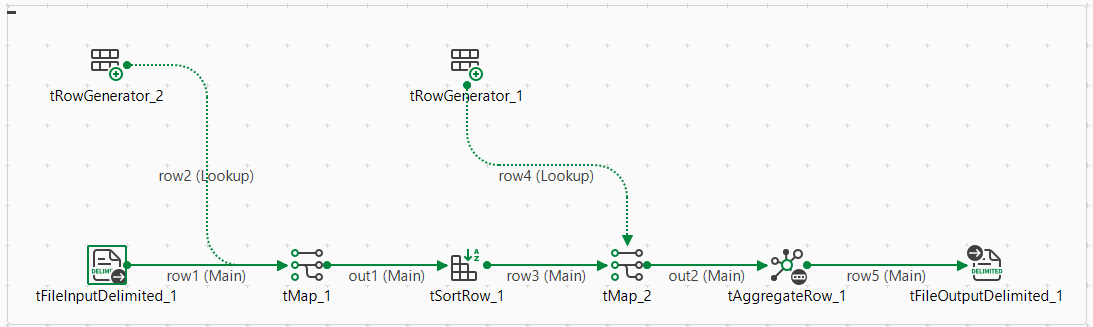
For example, assume that you have designed the following Spark Batch Job and you want to generate lineage information about it in Atlas:
In this Job, tRowGenerator is used to generate the input data, tMap and tSortRow to process the data and the other components to output data into different formats.
- Click Run to open its view and then click the Spark configuration tab.
- From the Distribution list and the
Version list, select your Hortonworks distribution. The
Use Atlas check box is displayed.
With this option activated, you need to set the following parameters:
-
Atlas URL: enter the location of the Atlas to be connected to. It is often http://name_of_your_atlas_node:port
-
In the Username and Password fields, enter the authentication information for access to Atlas.
-
Set Atlas configuration folder: if your Atlas cluster contains custom properties such as SSL or read timeout, select this check box, and in the displayed field, enter a directory in your local machine, then place the atlas-application.properties file of your Atlas in this directory. This way, your Job is enabled to use these custom properties.
You need to ask the administrator of your cluster for this configuration file. For further information about this file, see the Client Configs section in Atlas configuration.
- Die on error: select this check box to stop the Job execution when Atlas-related issues occur, such as connection issues to Atlas. Otherwise, leave it clear to allow your Job to continue to run.
-
Till now, the connection to Atlas has been set up. The time when you run this Job, the lineage will be automatically generated in Atlas. You still need to configure the other parameters in the Spark configuration tab in order to successfully run the Job. For more information, see Creating Spark Batch Jobs.
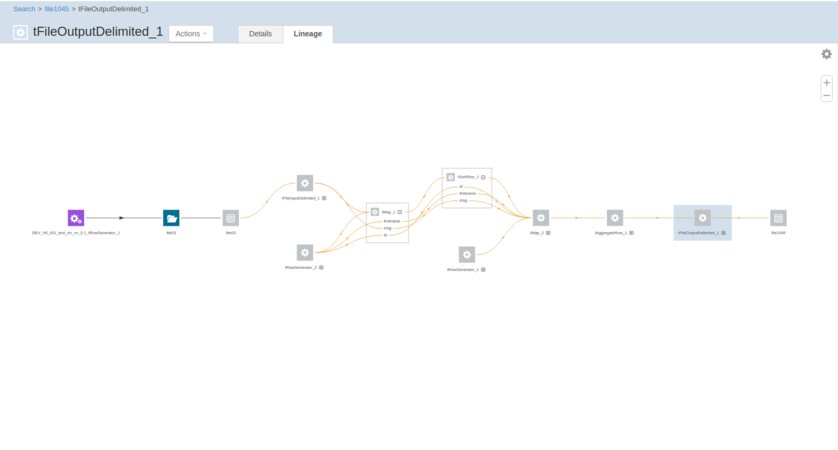
When the execution of the Job is done, perform a search in Atlas for the lineage information written by this Job and read the lineage there.
Reading the Atlas lineage
-
-
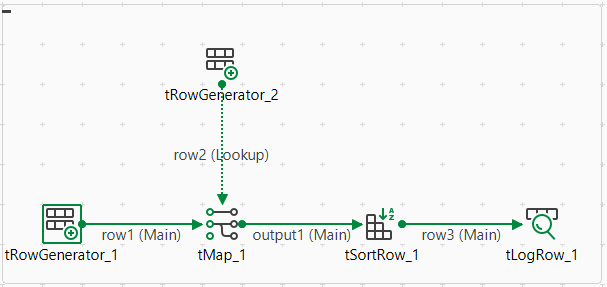
The Job itself.
-
The components in the Job that are using data schemas, such as tRowGenerator or tSortRow. The connection or configuration components such as tHDFSConfiguration are not taken into account since these components do not use schemas.
-
-
Talend for all the entities generated by the Job
-
TalendComponent for all the component entities.
-
TalendJob for all the Job entities.
You can directly click one of these tags in Atlas to display the corresponding entities.