Use Case: Creating a pipeline to process financial data
- Cloud API Services Platform
- Cloud Big Data
- Cloud Big Data Platform
- Cloud Data Fabric
- Cloud Data Integration
- Cloud Data Management Platform
- Cloud Pipeline Designer Standard Edition
- Data Fabric
How to create a pipeline that will enrich and filter hierarchical financial data (IBAN, account and transaction information, etc.), then aggregate and count the total amount of performed transactions.

Procedure
- Click Add pipeline on the Pipelines page. Your new pipeline opens.
-
On the top toolbar, click the
 pencil icon next to the pipeline default name and give a meaningful name to
your pipeline.
Example
Process financial data - Click ADD SOURCE to open the panel allowing you to select your source data, here the financial data dataset created previously.
-
Select your dataset and click Select in order to add it to
the pipeline.
Your dataset is added as a source and you can already preview your JSON data.
-
Click
 and add a Python 3 processor to the pipeline. This
processor will be used to copy Python code that will process and enrich input
data.
-
Give a meaningful name to the processor.
Example
enrich with IBAN validation -
In the Python code area, type in the following
code.
import string;

## IBAN Validation function;
ALPHA = {c: str(ord(c) % 55) for c in string.ascii_uppercase};
def reverse_iban(iban): return iban[4:] + iban[:4];
def check_iban(iban): return int(''.join(ALPHA.get(c, c) for c in reverse_iban(iban))) % 97 == 1;

output = input;
transaction = input['transaction'];
this_account = transaction["this_account"];
account_routing = this_account["account_routing"];
account_iban = account_routing["address"].replace(" ", "");
output['iban_valid'] = check_iban(account_iban)
This code allows you to:- check that the IBAN syntax is valid
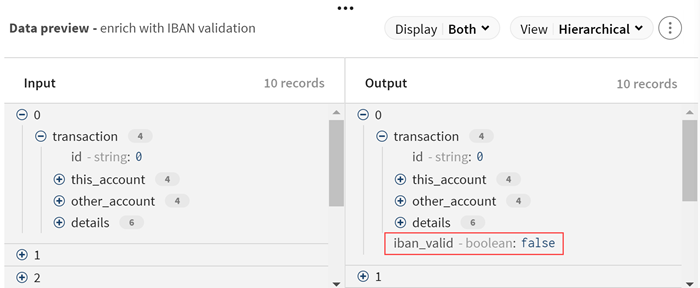
- add a new field named iban_valid to the existing records with values true or false depending on the result of the IBAN checking
-
Click Save to save your configuration.
Input data is processed accordingly and you can preview the modifications. The new iban_valid field is added to all records.

-
Click
 and add a Filter processor to the pipeline. This
processor will be used to isolate accepted transactions (tagged with
AC, compared to DC, declined
transactions).
-
Give a meaningful name to the processor.
Example
filter on accepted transactions -
In the Filters area:
- Select .transaction.details.type in the Input list, as you want to filter customers based on this value.
- Select None in the Optionally select a function to apply list, as you do not want to apply a function while filtering records.
-
Select = = in the Operator list
and type in AC in the Value list
as you want to filter on transactions that were accepted.
You can use the avpath syntax in this area, for more information see What is avpath and why use it?.
- Click Save to save your configuration.
Input data is processed accordingly and you can preview the modifications. Only records containing accepted transactions (AC) are kept in the output.
-
Click
 and add an Aggregate processor to the pipeline. This
processor will be used to group transactions and calculate the total amount of these
transactions.
-
Give a meaningful name to the processor.
Example
count transaction amounts with valid IBAN -
In the Group by area,
specify the fields you want to use for your aggregation set:
- Select .transaction.details.description in the Field path list.
- Add a new element and select .iban_valid in the list.
-
In the Operations
area, add an aggregate operation:
- Select .transaction.details.value.amount in the Field path list and Sum in the Operation list.
- Name the generated field, total_amount for example.
- Click Save to save your configuration.
Input data is processed accordingly and you can preview the calculated data after the filtering and grouping operation. There are 252 transactions with a valid IBAN and 81 transactions with a non-valid IBAN.
- Click the ADD DESTINATION item on the pipeline to open the panel to select the dataset for your output data: the financial data dataset you created earlier. You can use the same dataset for input and output because the test datasets behave differently in source and destination, and when used in a destination the data is ignored.
-
Give a meaningful name to the destination.
Example
processed data - Click Save to save your configuration.
Did this page help you?
If you find any issues with this page or its content – a typo, a missing step, or a technical error – please let us know!
