Skip to main content Skip to complementary content

Initiating the workflow and finish the workflow tasks

Availability-noteDeprecated

Usually the first step of any workflow is a kind of an initiating step that will trigger the workflow itself through doing specific modification on master data. However, this modification will not be saved before going through all designed steps in the workflow and finish by being approved or not.

The business user assigned the initiating step will trigger the workflow and then each step in the workflow will be enabled after the completion of the previous step.

The following example uses the workflow imported from the MDM Demo project. The workflow Product_Product has been designed to validate any change in the price of a product. In the workflow, two human interventions are defined: the first to initiate the change and the second to validate this change. For further information on workflows, see the Talend Studio User Guide.

Before you begin

  • The MDM server is already launched.

  • The BPM server has already been started.

  • The MDM user information has been synchronized from MDM to the BPM server.

  • You have been assigned the role with the appropriate user authorization and access rights.

  • At least one workflow is defined in Talend Studio in which you have been defined as the user to intervene at the workflow initiating step.

  • A Runnable Process has been created to launch the workflow. For further information on the Runnable Process, see the Talend Studio User Guide.

  • You have selected the data container that holds the master data you want to manage and the data model against which the master data will be validated.

About this task

To initiate a change on master data through a specific workflow and finish the workflow task, complete the following:

Procedure

  1. Log into Talend MDM Web UI and in the Welcome page, click Master Data Browser. The corresponding page is displayed.

    From the Entity list at the top of the page, select the entity which contains the data records you want to display, Product in this example. Click Search.

    All the data records of the selected entity are displayed in the page and the details of the first record open by default in the panel to the right.

  2. Click the data record for which you want to initiate a change in data.

    The details of the selected record are displayed in the panel to the right.

  3. In the upper-right corner of the page, click the arrow and select from the list the Runnable Process that has been defined to trigger the workflow that will modify the price of a product.
  4. Click the button to launch the selected Runnable Process. Request Price Change is selected in this example.
    Repeat the operation to launch the process and initiate the change in other data records as necessary.
  5. On the Menu panel, click Govern > Workflow Console to open the corresponding page.

    A task for each of the data records has been listed in the Tasks view.

    Information noteNote: By default, you will log into the Bonita BPM web portal as the same user you log into Talend MDM Web UI. The web portal page may look different and allow different operations according to the roles of the login user.

    If the Bonita BPM server is installed as a standalone application, you can choose to log into the web portal as a different user.

  6. Select the task and click TAKE to do the workflow task.

    If a customized form for the workflow task has been defined in Talend Studio, this customized form is displayed to show the task detail.

    For further information about how to define a customized form and how to use a Talend web template as the customized form, see the Talend Studio User Guide.

    If no customized form has been defined, the default form is displayed showing all the task detail.

  7. In the Enter New Price field, enter a new price number, and then click REQUEST APPROVAL to submit the information.
    Now an authorized user needs to validate the price change of the product.
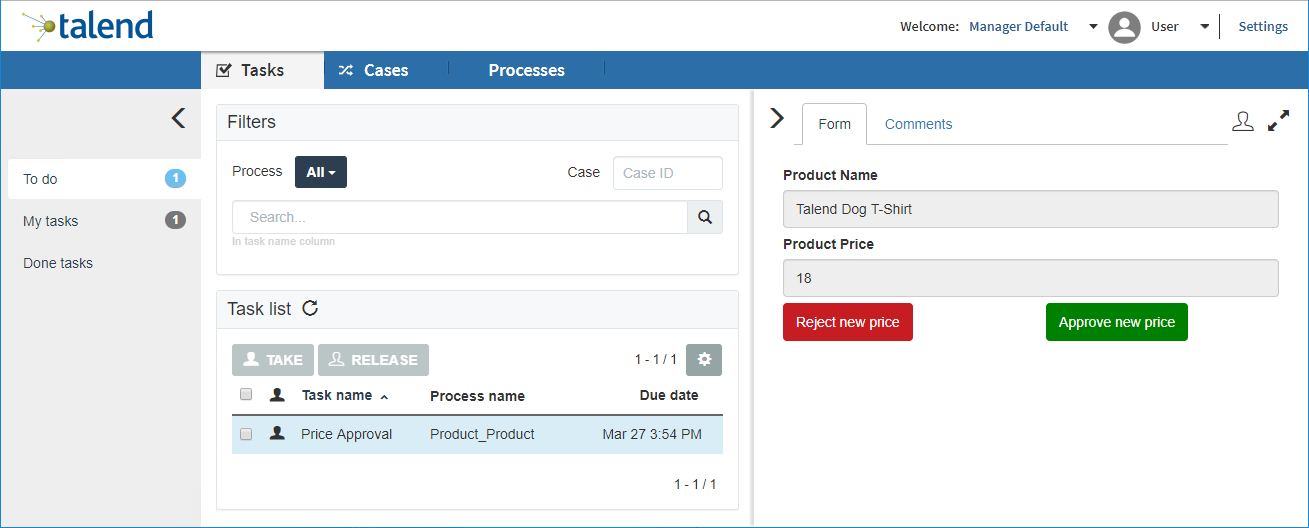
  8. Take the Price Approval task to initiate the price validation.

    Review the new price and then approve or reject the new price according to your need. In this example, click APPROVE NEW PRICE.

    A page is displayed, which shows that the information is submitted and no task is available now.

  9. Select Done tasks on the left panel of the Task tab.
    The page lists the workflow task(s) you have finished, and the details of each task.
  10. Go back to Talend MDM Web UI, and in the Master Data Browser page, verify that the modified data record now has the newly approved price.

Did this page help you?

If you find any issues with this page or its content – a typo, a missing step, or a technical error – please let us know!