Skip to main content Skip to complementary content
  • New archived content: Talend MDM, Talend Data Catalog 8.0, and Talend 7.3 products reached their end of life in 2024. Their documentation was moved to the Talend Archive page and will no longer receive content updates.
Close announcements banner

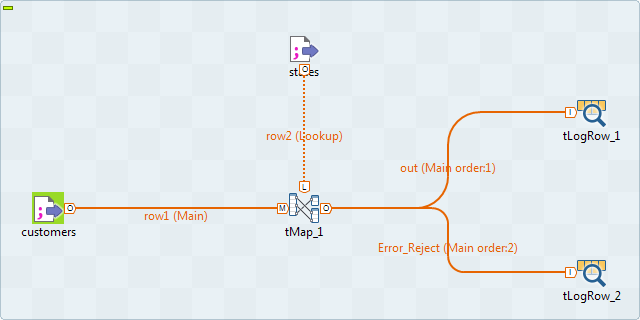
Mapping with join output tables

The following scenario describes a Job that processes reject flows without separating them from the main flow.

Linking the components

Before you begin

You have created two file metadata connections under Metadata > File delimited in the Repository view for the following two files.
  • states.csv
  • customers.csv

For more information about centralizing metadata, see Managing metadata in Talend Studio.

Procedure

  1. In the Repository tree view, click Metadata > File delimited. Place the customers metadata onto the workspace.
    The customers metadata contains information about customers, such as their ID, their name or their address, etc.
  2. In the dialog box that asks you to choose which component type you want to use, select tFileInputDelimited and click OK.
  3. Place the states metadata onto the design workspace. Select the same component in the dialog box and click OK.
    The states metadata contains the ID of the state, and its name.
  4. Place a tMap and two tLogRow components from the Palette onto the design workspace.
  5. Connect the customers component to the tMap, using a Row > Main connection.
  6. Connect the states component to the tMap, using a Row > Main connection. This flow will automatically be defined as Lookup.
    Components connection.

Configuring the components

Procedure

  1. Double-click the tMap component to open the Map Editor.
    Place the idState column from the main input table to the idState column of the lookup table to create a join.
    Click the tMap settings button and set Join Model to Inner Join.
  2. Click the Property Settings button at the top of the input area to open the Property Settings dialog box, and clear the Die on error check box in order to handle the execution errors.
    The ErrorReject table is automatically created.
    Property Settings dialog box
  3. Select the id, idState, RegTime and RegisterTime in the input table and drag them to the ErrorReject table.
    ErrorReject table.
  4. Click the [+] button at the top right of the editor to add an output table. In the dialog box that opens, select New output. In the field next to it, type in the name of the table, out1. Click OK.
  5. Drag the following columns from the input tables to the out1 table: id, CustomerName, idState, and LabelState.
    Add two columns, RegTime and RegisterTime, to the end of the out1 table and set their date formats: "dd/MM/yyyy HH:mm" and "yyyy-MM-dd HH:mm:ss.SSS" respectively.
  6. Click in the Expression field for the RegTime column, and press Ctrl+Space to display the auto-completion list. Find and double-click TalendDate.parseDate. Change the pattern to ("dd/MM/yyyy HH:mm",row1.RegTime).
  7. Do the same thing for the RegisterTime column, but change the pattern to ("yyyy-MM-dd HH:mm:ss.SSS",row1.RegisterTime).
    RegisterTime column.
  8. Click the [+] button at the top of the output area to add an output table. In the dialog box that opens, select Create join table from, choose Out1, and name itrejectInner. Click OK.
  9. Click the tMap settings button and set Catch lookup inner join reject to true in order to handle rejects.
  10. Drag the id, CustomerName, and idState columns from the input tables to the corresponding columns of the rejectInner table.
    Click in the Expression field for the LabelState column, and type in "UNKNOWN".
  11. Click in the Expression field for the RegTime column, press Ctrl+Space, and select TalendDate.parseDate. Change the pattern to ("dd/MM/yyyy HH:mm",row1.RegTime).
  12. Click in the Expression field for the RegisterTime column, press Ctrl+Space, and select TalendDate.parseDate, but change the pattern to ("yyyy-MM-dd HH:mm:ss.SSS",row1.RegisterTime).
    If the data from row1 has a wrong pattern, it will be returned by the ErrorReject flow.
    Expression field.
    Click OK to validate the changes and close the editor.
  13. Double-click the first tLogRow component to display its Component view.
    Click Sync columns to retrieve the schema structure from the mapper if needed.
    In the Mode area, select Table.
    Do the same thing with the second tLogRow.

Executing the Job

Procedure

  1. Press Ctrl+S to save your Job.
  2. Press F6 to execute it.

Results

The Run console displays the main out flow and the ErrorReject flow. The main output flow unites both valid data and inner join rejects, while the ErrorReject flow contains the error information about rows with unparseable date formats.

Job results.

For examples of how to use dynamic schemas with tMap, see:

Did this page help you?

If you find any issues with this page or its content – a typo, a missing step, or a technical error – please let us know!