How to connect to Salesforce using OAuth JWT Flow
This article shows you how to connect to Salesforce using OAuth 2.0 JWT (JSON Web Token) authentication flow.
Talend provides two connection types to access Salesforce via Salesforce components or metadata wizard:
-
Basic: connects to Salesforce using your Salesforce account username, password, and security token information. For a related use case, see Upserting Salesforce data based on external IDs.
-
OAuth Json Web Token Flow: connects to Salesforce using OAuth 2.0 JWT authentication flow. For more information about OAuth 2.0 JWT Flow, see the Salesforce official documentation Digging Deeper into OAuth 2.0 in Salesforce.
Before you begin
Before connecting to Salesforce using OAuth 2.0 JWT Flow via Salesforce components or metadata wizard, you need to create your own connected app required by JWT Flow in Salesforce via the following steps.
-
Go to , click Create Self-Signed Certificate to create a self-signed certificate and then download the certificate to your local machine. In this example, the certificate talend_certificate has been created and downloaded to D:\talend_certificate.crt for demonstration purpose. For more information about how to create a self-signed certificate, see the Salesforce official documentation Generate a Self-Signed Certificate.

- Click Export to Keystore to export your certificate to a keystore file in JKS (Java Keystore) format. In this example, the certificate is exported to D:\00D28000001O6WS.jks.
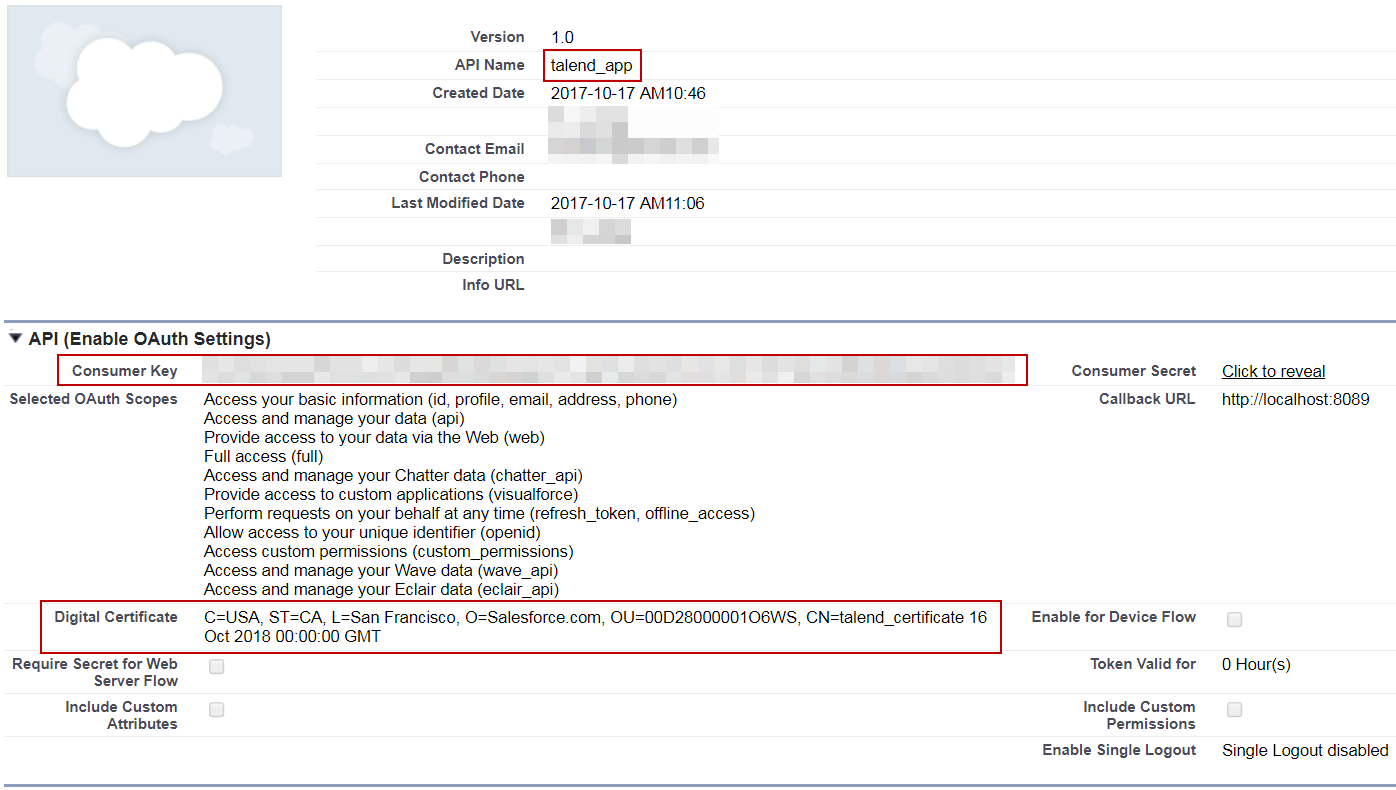
- Go to , click New in the Connected
Apps area and create a connected app that enables OAuth settings
and uses the digital certificate D:\talend_certificate.crt
you have downloaded. A consumer key will be generated for the JWT authorization
flow. In this example, the connected app talend_app has
been created for demonstration purpose. For more information about how to create
a connected app, see the Salesforce official documentation Create a Connected App.

- Approve the consumer before using it after creating the connected app. To do
this, copy and paste the authorize URL
https://login.salesforce.com/services/oauth2/authorize with
the following query string parameters into your web browser's address bar, press
Enter and accept the access authorization.
- client_id: the value is the consumer key.
- redirect_uri: the value is https://login.salesforce.com/services/oauth2/success.
- response_type: the value is code.
The authorize URL and the query string parameters are concatenated with a question mark ?, and every two query string parameters are concatenated with an ampersand &. An example URL is shown below, with line breaks for readability. You need to join all these lines into one line before copying and pasting the URL into your web browser's address bar.
https://login.salesforce.com/services/oauth2/authorize?
client_id=3MVG9ZL0ppGP5UrCLU3Fzejy8RgQbnFad6mMbHtzjB3kb7OJqkfyVJ8TyiXtK_dPkwnUY3SsaEUHwEEu3bN3l&
redirect_uri=https://login.salesforce.com/services/oauth2/success&
response_type=code
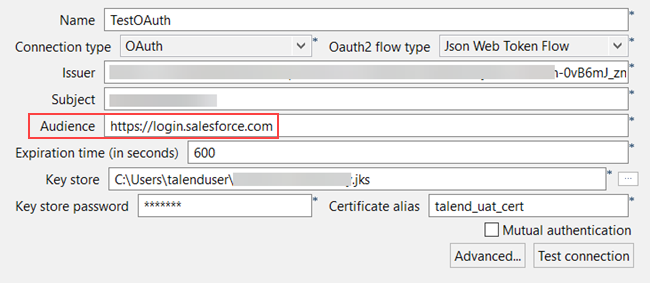
Now you can connect to Salesforce using OAuth 2.0 JWT authentication flow via Salesforce components or metadata wizard. In the following example, the Salesforce metadata wizard will be used to test the connection to Salesforce using OAuth 2.0 JWT Flow.

