Configuring the components
Procedure
-
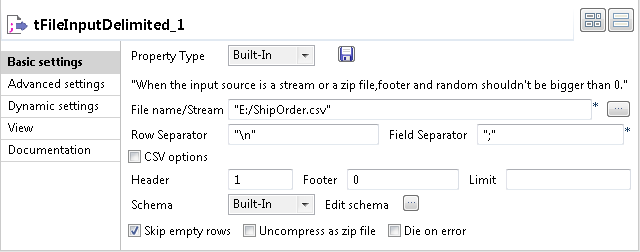
Double-click the tFileInputDelimited
component to open its Basic settings view on
the Component tab.

-
In the File name/Stream field, specify the
path to the input file. In this example, it is E:/ShipOrder.csv.
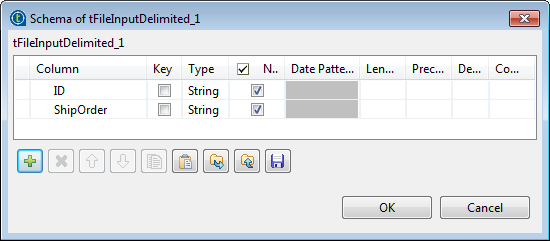
In the Header field, enter 1 to skip the first header row of the input file.Click the [...] button next to Edit schema and define the schema by adding two columns ID and ShipOrder of String type.

-
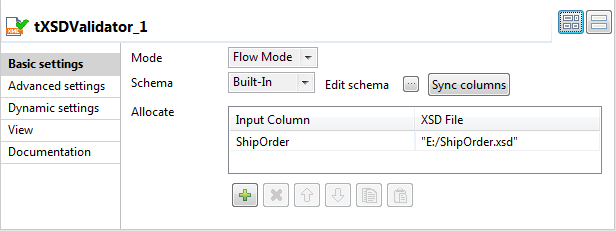
Double-click the tXSDValidator component to
open its Basic settings view on the Component tab.

-
Click the Sync columns button to retrieve the
schema from the preceding tFileInputDelimited
component, and in the pop-up dialog box, click Yes to propagate the schema to the two tFileOutputDelimited components.
Add a row in the Allocate table by clicking the [+] button. Then click the Input Column cell and select the XML column ShipOrder to be validated from the drop-down list. And in the XSD File cell, enter the path to the XSD reference file, E:/ShipOrder.xsd in this example.
-
Double-click the first tFileOutputDelimited
component to open its Basic settings view on
the Component tab.

-
In the File Name field, specify the path to
the output file that will store valid rows. In this example, it is E:/ShipOrder_Valid.csv.
Select the Include Header check box to include column headers in the output file.
-
Double-click the second tFileOutputDelimited
component to open its Basic settings view on
the Component tab.

-
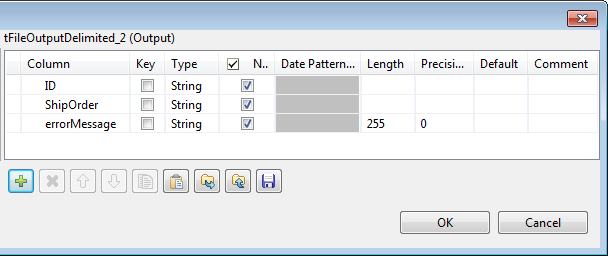
Click the [...] button next to Edit schema to view its schema.
 You can see an extra column errorMessage that holds the error information for invalid rows is added automatically into the schema in addition to the two propagated columns.
 -
In the File Name field, specify the path to
the output file that will store invalid rows and error messages. In this
example, it is E:/ShipOrder_Invalid.csv.
Select the Include Header check box to include column headers in the output file.
Did this page help you?
If you find any issues with this page or its content – a typo, a missing step, or a technical error – please let us know!
