Configuring the tMelissaDataAddress component
Procedure
-
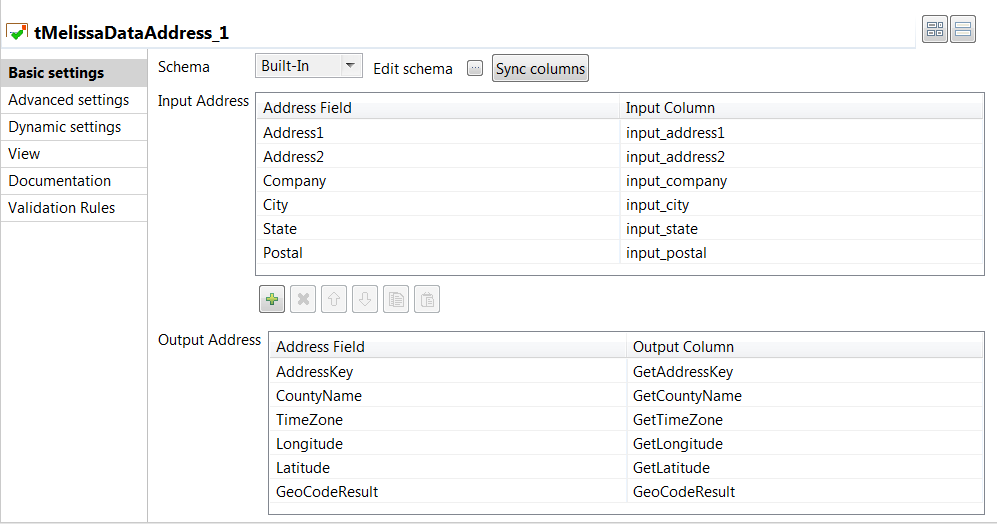
Double-click tMelissaDataAddress to display the Basic
settings view and define the component properties.

- Click Sync columns to retrieve the schema from the preceding component.
-
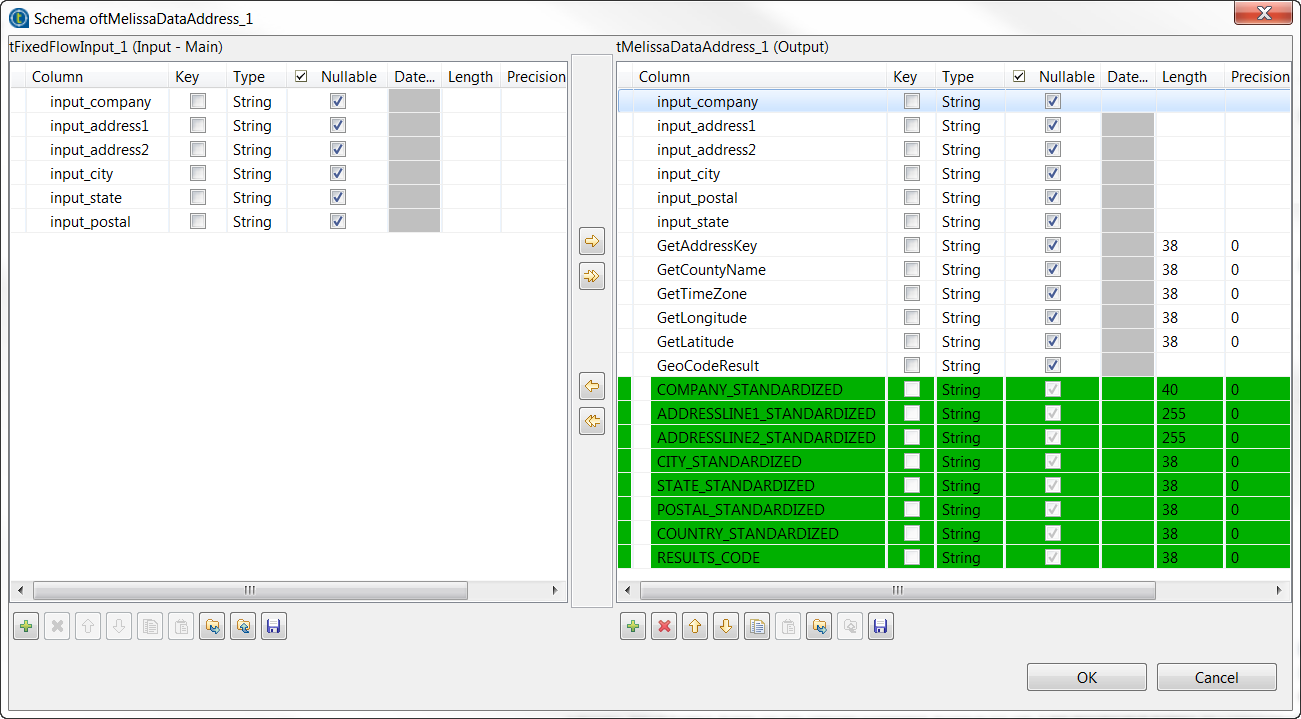
Click the Edit schema
button to view the input and output schema and edit the output schema, if
necessary.
 Read-only columns are added the output schema:
- COMPANY_STANDARDIZED returns the standard company name.
- ADDRESLINE1_STANDARDIZED returns the first line of the street address.
- ADDRESLINE2_STANDARDIZED returns the second line of the street address.
- CITY_STANDARDIZED returns the standard city name.
- STATE_STANDARDIZED returns a two-letter abbreviation for the state name.
- POSTAL_STANDARDIZED returns the postal ZIP code.
- COUNTRY_STANDARDIZED returns a two-letter abbreviation for the country name.
- RESULT_CODES returns verification codes.
- Click OK to close the dialog box.
-
In the Input Address
table:
- Use the [+] button to add lines in the table.
-
Click in the Address Field column and select
from the predefined list the fields that hold the input address
data.
The component will map the values of these fields to the input columns you set in this table.
- Click in the Input Column column and select from the list the columns from the input schema that hold the input address data you want to parse.
-
In the Output Address
table, you can define additional address fields:
- Use the [+] button to add lines in the table. These lines will hold the extra information you want to retrieve from Melissa Data, such as the Address Key, the country name or longitude and latitude data.
-
Click in the Address Field column and select
from the predefined list the fields that hold the output address
data.
The component will map the values of these fields to the output columns you set in this table.
-
Click in the Output Column column and select
from the list the columns from the output schema that will hold the
extra information.
If you click Sync Columns after adding columns to the output schema, they are removed.
-
In the Specify your MelissaData
license field, set your license key provided by Melissa Data
when you order the Data Quality Suite or the Address Object API.
If the license key you entered is not correct, you can use GeoCoder in demo mode.
- In the Specify your MelissaData DataFile folder field, set the path to the Melissa Data data folder provided by Melissa Data.
-
In the Advanced settings
view of the component, select the license you purchased.
If you have not purchased a GeoPoint or a GeoCode license, select No Melissa GeoCoder License Was Purchased to run the Job. Note that you will not be able to retrieve latitude and longitude data and GeoCode result codes.
Did this page help you?
If you find any issues with this page or its content – a typo, a missing step, or a technical error – please let us know!
