Configuring the components
Procedure
-
Double-click tMDMRestInput
to view its Basic settings in the
Component tab.

-
In the Schema list,
select Built-In and then click the
[...] button next to Edit schema to open a dialog box in which you
can define the structure of the retrieved data.
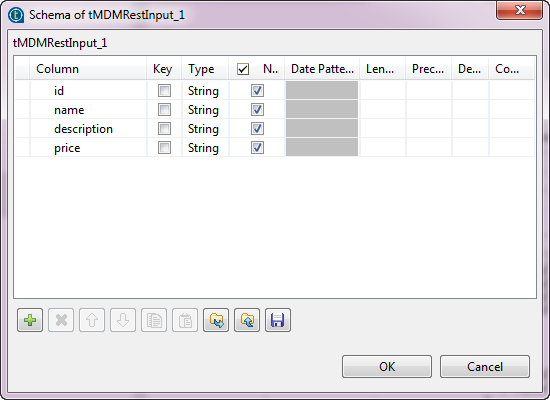
In this example, we will extract the four elements of the product information defined in the Product data model into the four fields: id, name, description and price.

-
Click the [+] button and
add four columns of the type String.
The data records retrieved from the MDM server need to be mapped into a correct schema. For more information, see How to set the schema correctly based on the query text when using tMDMRestInput.
-
Click OK to validate
your changes.
The Propagate dialog box pops up. Click Yes to propagate your changes.
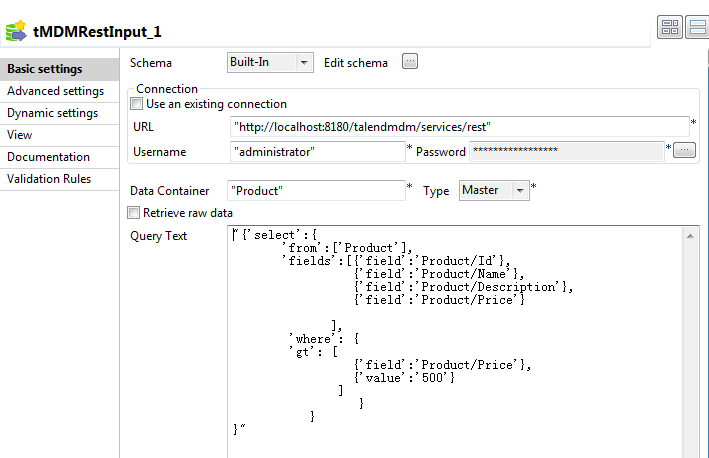
- In the URL field, enter the URL to access the MDM server through the REST API. In this example, leave it as default.
- In the Username and Password fields, enter the credentials to access the MDM server.
-
In the Data Container
field, enter the name of the container which holds the data you want to
retrieve, Product in this example.
Then, select Master from the Type list.
- Leave the check box Retrieve raw data clear since in this example we will use a query text to retrieve four fields from the Product data container.
-
In the Query Text area,
enter the query you want to include in the REST API calls for retrieving the
data records of interest. The entire query text is enclosed with double
quotes.
In this example, enter the following to retrieve the product record(s) with a price larger than 500:
"{'select':{ 'from':['Product'], 'fields':[{'field':'Product/Id'}, {'field':'Product/Name'}, {'field':'Product/Description'}, {'field':'Product/Price'} ], 'where': { 'gt': [ {'field':'Product/Price'}, {'value':'500'} ] } } }" - Double-click tLogRow and then select Table from the Mode list.
Did this page help you?
If you find any issues with this page or its content – a typo, a missing step, or a technical error – please let us know!
