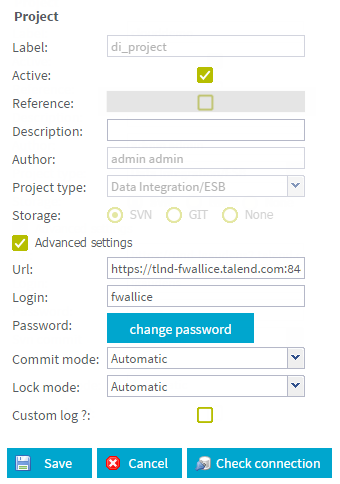
To add a project which is stored in SVN or GIT
About this task
Procedure
- In the Menu tree-view, select Projects to open the project list page.
-
From the toolbar, click Add.
Mandatory fields in the Project panel to the right are followed by
 .
.Example

-
In the Project panel,
enter the following information:
Field
Description
Label
Type in the project name. This name should match the project name you will connect to in Talend Studio.
Active
Select/clear this check box to activate/deactivate the current project.
Reference
When you select a project in the Projects list that is already used as a project reference, this check box is selected by default.
Description
Fill in a description if needed.
Author
The first and last names of the project author. This field is read-only and so cannot be modified.
Project type
Select the type of project according to the license you set in Talend Administration Center. For more information, see What domains can you work in depending on your user type and license.
Information noteNote: If the license set in Talend Administration Center is a Data Integration or ESB license only, this field will not display as there will not be other types available.Big Data Enabled
Enable so that only Big Data Enabled users/user groups can access the project.
Storage
Select the storage type SVN or GIT depending on where your project is stored.
Advanced settings
Select this check box if you want to use a connection (URL), a commit mode (Commit mode), or a lock mode (Lock mode) which differ from the default connection you have defined on the Configuration page, then fill in the fields that follow according to your needs.
For more information on the connection used by default, see Setting up SVN or Git parameters.
Url
Enter the connection URL to the SVN or GIT repository.
Information noteNote: When you create a project, note that SVN automatically creates a default structure in your repository (<project name>/branches|tags|trunk) to store the project metadata.For SVN projects:
Subversion URLs use the following syntax: Repository URL/project name.
A typical Subversion repository often holds the files (or source code) for several projects. Usually, each project is a subdirectory in the repository's file system tree.
Subversions' URLs can match any of the following syntaxes:
svn+ssh://<login>@<hostName>/<repositoryName>/<project name>ex:
- svn+ssh://tisadmin@10.42.0.10/svn/repo/tac_di
- http://10.42.10.99/repo/<project name>
Login
Type in the user login to the repository.
Password
Type in the user password to the repository.
Commit mode
Different types are possible to submit the latest changes done to Projects or to any item in the Repository in Talend Studio:
- Automatic: Talend Studio automatically commits the changes made on the Project and Repository items. This is the default setting,
- Unlocked items: Talend Studio commits the changes made on certain items when those items are unlocked. An item is unlocked either when you close it or when you manually unlock it, depending on theLock mode selected (see Lock mode in this table).
Lock mode
Different SVN lock types are possible:
- Automatic: Items are automatically locked/unlocked when a user wants to edit them in Talend Studio,
- Ask user: The user is prompted to lock/unlock items when needed,
- Manual: The user needs to manually use the Lock/Unlock option in the contextual menu of the items.
For more information regarding lock management, see Removing locks on projects.
Custom log
Select this check box if you want the users to be prompted to enter their own commit log for each commit. The auto generated application log will be still appended at the end.
- Click Check connection to verify your connection status.
- Click Save to validate the creation of the new project or click Cancel to cancel it.
Did this page help you?
If you find any issues with this page or its content – a typo, a missing step, or a technical error – please let us know!
